How To Set Up Your First Facebook Ad
What’s a Rich Text element?
The rich text element allows you to create and format headings, paragraphs, blockquotes, images, and video all in one place instead of having to add and format them individually. Just double-click and easily create content.
Static and dynamic content editing
A rich text element can be used with static or dynamic content. For static content, just drop it into any page and begin editing. For dynamic content, add a rich text field to any collection and then connect a rich text element to that field in the settings panel. Voila!
How to customize formatting for each rich text
Headings, paragraphs, blockquotes, figures, images, and figure captions can all be styled after a class is added to the rich text element using the "When inside of" nested selector system.
Facebook is often considered the grandfather of social media, especially when it comes to digital marketing. In fact, Facebook accounts for nearly 10% of all global digital advertisements, with over 90% of digital marketers using its platform as a launchpad.
Whether you’re a business, brand, or influencer, you need to be considering a digital paid ads strategy that will complement your overall digital marketing strategy. There’s a reason why over 90% of marketers worldwide use Facebook ads to grow their business…
In what follows, we’ll be sharing a step-by-step guide for setting up your very first Facebook ad. If implemented correctly, you should begin to see growth in no time!
Types Of Facebook Ads Offered
Before embarking on setting up your first ad, it’s important to decide which type of ad to choose based on your goals and objectives. In order to decide what type of ad to choose, however, you need to first understand what types are offered.
Facebook ads can be made up of:
- Image ads
- Video ads
- Polls
- Carousel ads
- Collection ads
- Messenger ads
All of this might sound foreign but don't worry, here's a little breakdown of what each are:
Image ads
Self-explanatory, image ads use the content of existing Facebook posts or the input of an external image to promote a sponsored post.
Video ads
Appearing in Facebook feeds and stories, video ads are also quite self-explanatory; using video content to promote a product or service via a demo or the like.
Polls
This type of ad is only available on mobile, however, mobile is becoming the predominant device of consumption, so it’s worthwhile pursuing. Polls are a great way to gain customer insight and increase engagement.
Carousel ads
Carousel ads can comprise images or videos and display in a carousel, slideshow-like fashion. Carousel ads a great for outlining various benefits of a product/service, introducing a number of staff available for contact, or sharing multiple links to separate web pages.
Collection ads
These use product feed data or items in your Facebook shop to automatically populate the ad with what might best suit the customer, or to show an infinite amount of products in a carousel style ad. These types of ads are great for e-commerce or retail store owners.
Messenger ads
One of the more under-utilised types of a Facebook ad are messenger ads. With messenger ads, the aim is to get potential customers to start a conversation with your Facebook or Instagram page, or to message your business via WhatsApp. There's a lot of powerful ways to use messenger ads, and they're great for service based industries or when your offer generally has a lot of questions!
Setting Up Your First Facebook Ad
If you’re a marketer, business owner, or brand looking to grow their digital presence and online success, you need to consider incorporating a digital ads strategy. If you’re reading this article, it’s safe to assume that that’s your intention!
In order to proceed with setting up your first Facebook ad, you need to first have a business profile. Once you’ve created a business profile, you need to visit Facebook’s Ad Manager to get started. It’s here where you’ll be setting up the ad campaign.
Upon logging in, you’ll be prompted with a “Campaign” tab. Simply click it and then click “Create”.

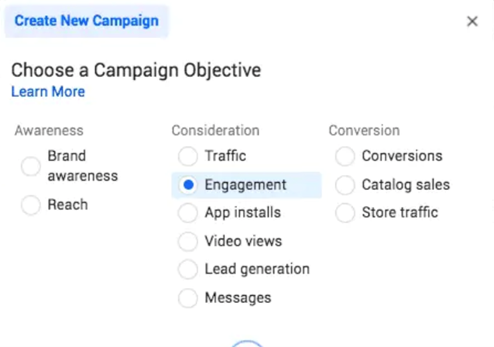
Step 1: Choose Your Campaign Objective
Thanks to Facebook’s comprehensive Ad Manager profile, you’re provided with a total of 11 campaign objectives to choose from. Each of these objectives falls under three categories; Awareness, Consideration, and Conversion.
Some of the most commonly chosen objectives include Brand Awareness, Traffic, Engagement, and Conversions. The list of all 11 will appear once you opt to create a new campaign. You can hover over each objective to understand more about what they are, but generally:
- If you want people to like, comment or share your post (engage with it) select "Engagement".
- If you want lots of traffic to your website and aren't too fussed about the quality of it, select "Traffic".
- If you want people to download and install your app, select "App Installs".
- If you want people to watch your video (e.g. a product demo) select "Video Views".
- If you want people to message your page and start a conversation, select "Messages".
- If you want to drive conversions (anything that your Facebook Pixel marks as a conversion e.g. a product sale, or a lead captured) select "Conversions".
- If you want to use a Collection Ad to promote a range of products, select "Catalogue Sales".

Once you’ve decided on an objective, simply proceed by clicking “Continue”.
Step 2: Naming & Budgeting Your Campaign
Upon selecting your campaign objective, it’s time to name your campaign to distinguish between future campaigns. Having a good naming convention can help with organising your Facebook Ads Manager. Some common practices are to include the audience that you're targeting, where you're targeting and what objective you chose in the campaign name.

In the same section there are also several special considerations that you can make, however, for simplicity’s sake, simply proceed to part two which is budgeting.
Before setting your budget, you do have the option to optimise it or leave the budget optimisation feature off. Again, it’s up to you, however, for simplicity’s sake, and because it’s only your first ad, leave this on and let Facebook have control over the budget.
To set your budget, simply opt for a lifetime or daily budget and input your desired amount. For the most efficient use of your investment, consider scheduling a daily budget based on your target audience’s time zone.

Step 3: Select Your Target Audience
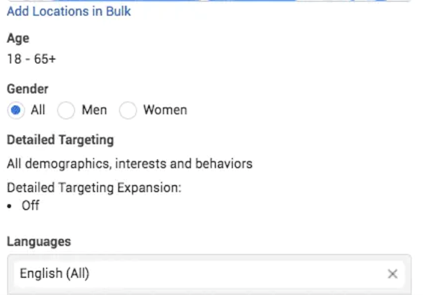
In this section, you can either choose a custom audience or create your own. This article will be focusing on targeting from scratch. When choosing your target audience, you’ll be provided with the options of identifying location, age, gender, and language. Other demographics include interests and consumer behaviours. Be sure to add a few things here to help Facebook narrow down on your audience - don't go too specific though, as this will limit your potential market.

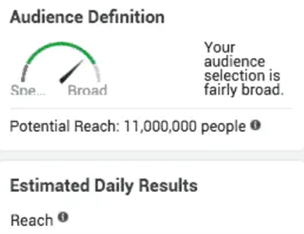
Thanks to Facebook’s comprehensive interface, you’re also provided with an audience definition tracker along with an estimated daily reach tool. Through manual targeting, you’ll see how large and how broad your audience is. In most cases, the broader the audience, the larger the reach, and the better optimised your ad can get. Be mindful that this figure is only an estimate.

Also a note here - don't forget to name your "Ad Set". Typically, you want to include "who" you're targeting in this naming convention. This might include things like the location, age, gender and interest that you've select, along with the placements.
Step 4: Choosing Ad Placements
When placing your ads, you have two options: manual placements or automatic placements. As a beginner creating your first ad, it’s recommended to allow Facebook’s insightful machine learning capabilities to automatically place your ad(s).
If you proceed to manually place your ads instead, there are several considerations to be made, including device type, platform of choice, in-app placements, and even device operating systems (i.e. Apple vs Android).
Once you’ve chosen ad placements, the final step (which we won’t go into detail with in this beginner’s guide) is to set brand safety and cost control features, leave these all as they are by default and click "Next" to move onto the next step.
Step 5: Create Your Ad!
Provided that you’ve filled in the details discussed above, and you’ve proceeded to choose an ad format, it’s now time to input the content of the ad itself; that is, the copy and visual content you’ve decided to use. Here is where you'll be able to upload a video or image, or create your carousel. There's a lot of options available, so we can't go into detail about it all, but it's pretty straight forward.
Again, don't forget to name your "Ad" before finalising it. Naming conventions here typically include the ad type (e.g. video or image) along with a short description of the ad, or something that you can easily identify what the ad is without looking at it (e.g. red background).
Because Facebook is largely visual in the way the ads appear, it’s important to understand how to properly write the ad copy in order to optimise for conversions and results. While this could be an entire article on its own, here are a few simple tips you can follow:
- Keep your copy short and sweet. That includes the headline, the description, the title, and even the call to action button. Most marketers nowadays try to limit their ad copy to two lines in the preview window.
- Tailor the voice to your target audience’s demographic. If you’re promoting a product to men above the age of 45, for example, you don’t want to use trendy lingo and millennial hashtags.
- Ensure that the copy aligns with the visual.
Before setting everything live, be sure to preview your ad to ensure that everything is in order and the way you intended it to be. After previewing, simply click “Publish” and you're done!
Congratulations! You’ve created your very first Facebook ad campaign. Now all that’s left to do is allow it to work its magic. Good luck!
If you want to get into the more advanced side of things, be sure to check out Facebook's own free course called the Facebook Blueprint. It's a great tool and resource that you can use to get your head around Facebook Ads better and improve your results.
Next Steps
If you're a small business owner and you need public liability, products liability, professional indemnity or cyber liability insurance, be sure to head over to our instant quote generator where you can get a quote on your business insurance in seconds!
.webp)

.svg)